Wire Wallet makes it easy to send and receive crypto across supported networks while giving you full visibility into fees, timing, and transaction status.
This guide walks through the full process—from starting a transaction to verifying it on the history screen.
How to Send Crypto
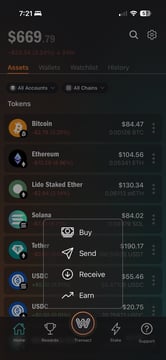
Step 1: Open the Transact Menu
From the home screen, tap the Transact button in the bottom navigation.
Then select Send.
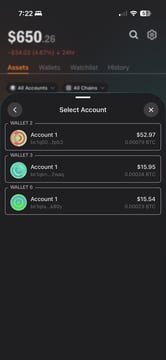
Step 2: Choose the Account to Send From
If you have multiple wallets or accounts:
-
Select the account you want to send from
-
Each account has its own address and balance
-
Make sure the account has enough funds for the amount plus network fees
You can switch accounts at any time before confirming.
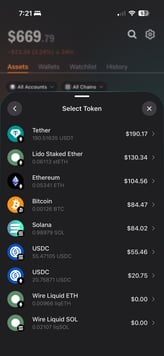
Step 3: Select the Token to Send
Next, choose the token or coin you want to send.
Examples:
-
Bitcoin (BTC)
-
Ethereum (ETH)
-
Solana (SOL)
-
USDC / USDT
-
Staked or liquid staking tokens (where supported)
Only tokens supported on the selected network will appear.
Step 4: Enter the Amount
Enter the amount you want to send:
-
Use the numeric keypad to enter a custom amount
-
Or tap quick options like $10, $20, or Max
-
You’ll see both the crypto amount and fiat equivalent
Wire Wallet automatically accounts for network fees, so you can see your total before continuing.

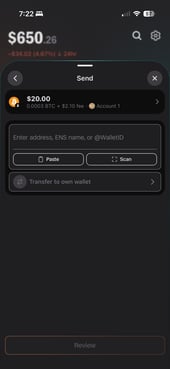
Step 5: Enter the Recipient Address
Enter where you want to send the funds:
You can:
-
Paste a wallet address
-
Scan a QR code
-
Enter a supported name or identifier (if available)
-
Transfer to one of your own wallets
⚠️ Important:
Always confirm:
-
The address is correct
-
The network matches the token
-
The recipient supports that network
Blockchain transactions are permanent.
Step 6: Review the Transaction Summary
Before sending, you’ll see a full transaction summary, including:
-
Sending account
-
Recipient address
-
Network
-
Amount being sent
-
Network fee
-
Total cost
-
Estimated confirmation time
Take a moment to review everything carefully.
If anything looks incorrect, go back and edit before sending.
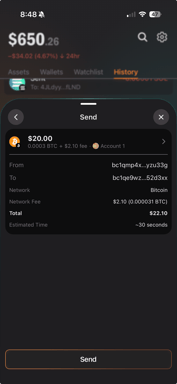
Step 7: Send the Transaction
When ready, tap Send to broadcast the transaction to the network.
Once sent:
-
The transaction is submitted on-chain
-
It cannot be canceled or reversed
-
Confirmation time depends on the network
How to Receive Crypto
To receive crypto:
-
Select the token you want to receive
-
Tap Receive
-
Copy your wallet address or share the QR code
-
Make sure the sender uses the correct network
Your receiving address is unique to your account and network.
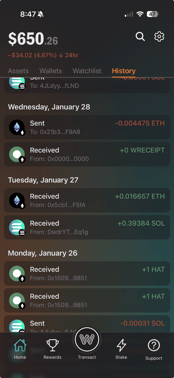
Verifying Your Transaction
Transaction Status
After sending, you can track progress in two places:
History Tab
-
Open the History tab from the main screen
-
View pending, confirmed, or failed transactions
-
Tap a transaction to see details
Block Explorer
For deeper details, Wire Wallet may link you to a block explorer, where you can see:
-
Confirmation status
-
Network fees
-
Block number
-
Timestamp
This is useful if a transaction is pending or delayed.
Common Tips & Best Practices
-
Double-check addresses before sending
-
Confirm the correct network every time
-
Send a small test transaction for large transfers
-
Keep extra balance available for network fees
-
Never send crypto to unsupported networks